Thursday, December 11, 2014

Trees and Balls - oh what fun!

My little tornado has been ill, so I needed a quick and easy mani for my son's holiday band concert. Since my pinky patch did not survive, I felt it best to have a pity party and then cut down all my nails :(

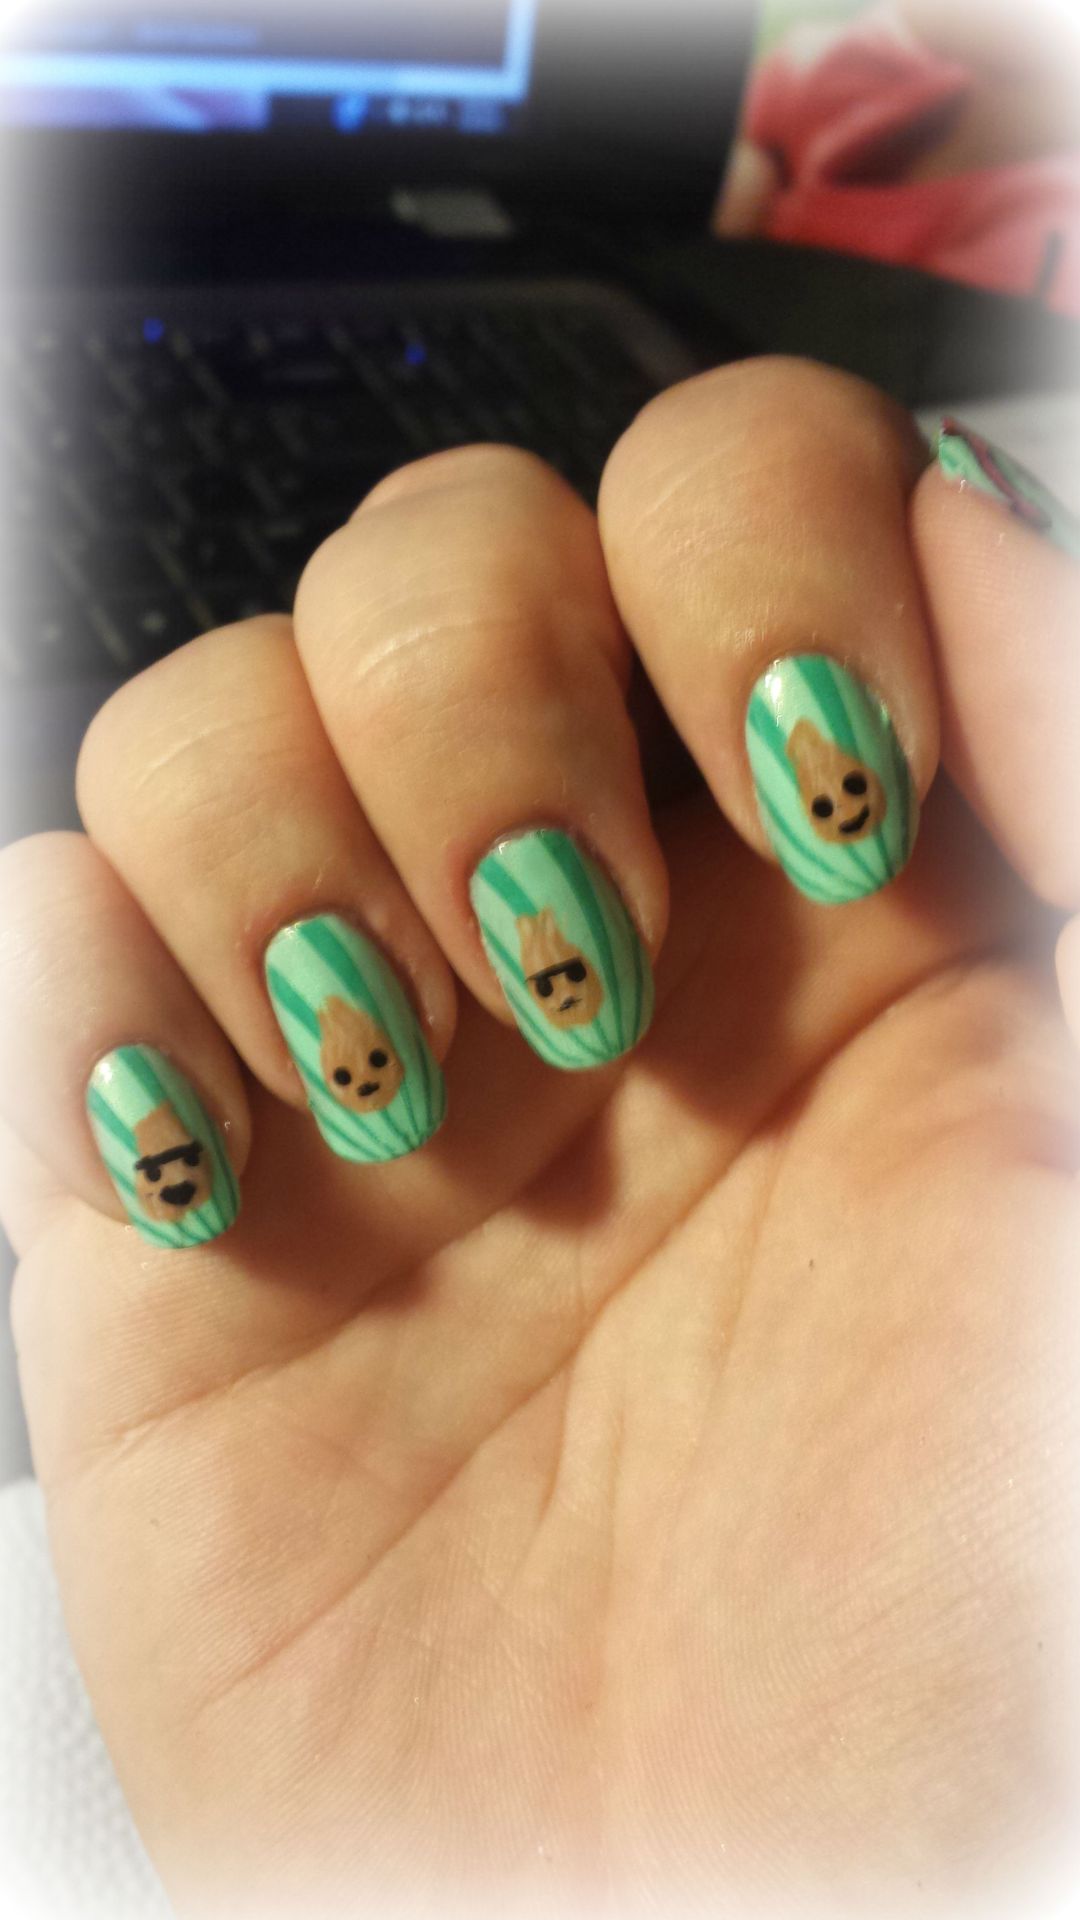
For the base I used Funky Fingers "Mrs Mint" and Funky Fingers (the tag fell off so I have no idea what the name is!) green on the ring finger. I used my dotting tools along with Kleancolor "Red," Kleancolor "White" and Funky Fingers green-with-no-name to create the dotted look. For the trees, I created little triangles with striping tape, and added more tape diagonally and horizontally to get the criss-crossed look. One coat of "Mrs Mint" and a dot of white on the top, and voila! Easy cute holiday mani.  I really like the striping tape Christmas tree - I have seen it around on Pinterest, Bloglovin, etc. Have you tried the tree design yet? What did you think?

Saturday, December 6, 2014

My Worst Nightmare

Ok, so it's not my worst nightmare, but it surely sucks. I cracked my pinky nail, about 1/4 of the way across my nail. I have no idea how, when or where I broke it - I just looked down and noticed a little crack....and then proceeded to curse.

Do you see that?!?!! Yeah, how much do you think that would hurt if I took it off? Hell NAW. So I decided to patch it. I used a tutorial I saw on Pinterest, using a tea bag as a patch. I emptied out a small tea bag, and cut myself a small square to cover the cracked area. I placed a small dot of nail glue on the break, and then laid down the patch. I then proceeded to smother that biyatch with more nail glue. It took a good while to dry - longer than I thought it would, but that was a good thing, since it allowed me to move the patch around with tweezers so it was positioned perfectly. After about 15 minutes, I lightly buffed the glue and added a coat of Nail Envy. (**If you have never used OPI Nail Envy, IMO it is worth every penny.)

Now I am off to paint these nails (no naked nails! ack!), and we will see how my little patch holds up.

I really just wanted to say that I tea-bagged myself. :P

Have you ever used this technique? Did it work for you? Ususally I say F*ckit and cut it off, but I want some length to do some bangin Christmas designs!

Wednesday, December 3, 2014

'Tis the Season!


Now that Thansgiving is over, it's on to Christmas nails! I am a firm believer in waiting until after Turkey Day to celebrate/do anything Christmasy. My first mani of the season is inspired by a tablecloth I got at the Christmas Tree Shop.

 I used a base of Zoya "Godiva", and then proceeded to get my stamp on! As soon as I got my new Born Pretty Store plates, I was loving the Christmas trees on plate BP-01, and knew it would be the first plate I would use. I utilized two other tree images from Bundle Monster plates BM205 and BM321. For stamping, I used the following polishes:
            - Kleancolor "Red"
            - Fresh Paint "Spruce Street"
            - Nicole by OPI "Promises in the Dark"
Lastly, I used a dotting tool to make tiny dots on some of the trees with Kleancolor "White," and a coat of Seche Vite - which really made my mani shine! 

I really like this design a lot, but with so many awesome new plates to use and only 3 more weeks left till Christmas, I don't know how long until I change it out for something else :)

Tuesday, November 25, 2014

Thanksgiving Nails


Thanksgiving is my all-time favorite holiday! I love that it's not over-commercialized -- just you, food and family.
This year's Turkey Day mani is full of stamping, decals and leadlighting, all from the Bundle Monster Holiday edition (plates BMH11, BMH12 and BMH13) I used Nails Inc "Porchester Square" as my base. For the turkey and the pumpkin, I created my own decals, using colors from The New Black "Runway Collection." The pilgrim hat was simply stamped on, and I used the Leadlighting method for the leaves and the grasses.
My hands are now ready for eating, drinking, and Cards Against Humanity on Thursday. :)

Sunday, November 23, 2014

Paw Prints and Hearts


When I saw this design on Pinterest, I thought it would look neat with paws and hearts instead of the flowers. The base is LA Colors on "Lost Soul," and stamped over with a white houndstooth design (plate m63). I then stamped on the paw print (plate QA23) and the heart (plate BM03).

Thursday, November 20, 2014

Inspired by @narmai


Another recreation! I found this on Pinterest, and knew right away I wanted it on my nails!  I started with a base of ELF in "Thunderstorm" and sponged on Finger Paints "Sparkle and Snowflake" for a glittery gradient. For the leaves, I used Red Angel stamping plate #RA-121, and then went over the design with a striper. (Red, orange and  yellow polishes from The New Black "Runway" collection.)

Monday, November 17, 2014

Inspired by: @alisnailart


Today's mani is inspired by an amazing artist I came across on Instagram, @alisnailart. For this design, I used Funky Fingers "Bizerk Turq" for the base, and then sponged on Funky Fingers in "220 Volts" on half the nail.  I sponged on some of China Glaze "Travel in Colour" for some shimmer, and used a striping brush with the Funky Fingers colors to add the finishing touches. I was very pleased with the results, and I cannot wait to try some of her other designs. :)

Sunday, November 9, 2014

It's my Birthday!


I had a fabulous birthday weekend :) I did a simple mani with Color Club's "Harp On It" and stamped it with Pueen26 and Pueen45. It was a pretty simple mani, but I was under time constraints, so it got the job done! Hope everyone had a great weekend -- I know I did!!

Tuesday, November 4, 2014

Tweed Nails inspired by Kawaii Claws


I was cruising Etsy for inspiration and came across KawaiiClaws.com. This chick is amazing! I pinned a couple of her manis to recreate. Today I used Essie "Play Date" for the base, and Essie "Full Steam Ahead" with Wet N Wild (sorry no name) to create the tweed look. I used a great tutorial from Valiantly Varnished for the tweed design, and put on the finishing touches with some rhinestones, pearls, and metal studs. :)

Thursday, October 30, 2014

Halloween Skittles - Part 2


This is the second half of my Skittles mani!

  • For my thumb, I used Essie "Fear or Desire" and topped it with Funky Fingers "Glitter Matters." 
  • I did a gradient on my pointer with the yellow and orange from The New Black Runway collection, plus some red from Wet N Wild (no name on the bottle!). The stamp is #BMH06. 
  • The middle finger is another gradient - this time with Zoya "Happi" and Essence "Breakthrough." The stamp is another from the Bundle Monster holiday collection, #BMH07. 
  • For the ring finger I used "Bewitched" from Two Gypsies, and stamped with #BMH07.
  • Finally, my little pinkie is painted with the yellow from TNB Runway collection, and stamped with #BMH08. 
And that's it! 

Wednesday, October 29, 2014

Halloween Skittles! Part I


Halloween is always a fun time of year for nail art peeps. There are so many cute ideas! I couldn't pick just one, so I decided to mix it up with a Skittle mani. I used 6 different stamps and 18 polishes, so I'm going to be breaking this up into 2 posts.


  •     I painted my thumb with NOPI "Always a Silver Lining" and stamped the adorable "Scary" stamp from My Online Shop stamp MJ#XXII. I sponged on a light black glitter polish (WnW Fergie "Rock N' Roll") around the stamp.
  •     The pointer is painted with Kleancolor "Neon Purple" and stamped with Salon Express white using stamp #m13
  •    My middle finger is a base of Essie (sorry no name on it), topped with Funky Fingers "Varsity Blue." I really like this glitter topper; it was too pretty to put anything over it. 
  •    The ring finger is Fresh Paint "Winning" stamped with Fresh Paint "Spruce Street" using Pueen stamp #PUEEN33. I added the little fimo Jack O' Lantern. I wanted it to look like a pumpkin patch, but it's kind of hard to see the vine stamping. Oh well. I still love the little pumpkin!
  •     Finally, for my pinky I used Whet "Facetious" with a light coat of the WnW "Rock N' Roll." I placed the little sequins on and topcoated them in. 
I don't normally wear skittle manis - I think they are cute, but something about the lack of symmetry on my own hands irritates me. I guess we will see how long this stays on :)


Tuesday, October 28, 2014

No Tricks, Just Treats


I am still raving about the Indigo Bananas polishes that I won. They are amazing!!! For this mani I used "Great Scott!" and added a little bit of Funky Fingers "Mirror Mirror" with a sponge around the tops of the nails, for a subtle gradient. For the tip of each nail, I used Red Angel stamp #RA105 to add a grassy look. I ended up filling in some of the spaces with a liner brush and black polish. In retrospect, I could have easily just painted on the grass, but I like using my stamps :) You can see in the pic below that I only used half of the image for the grass.
I wanted the houses to appear to have lights on, so I used the decal method. The house on the ring finger is from BM224, and the middle finger is from BM305. For the moon behind the house on the ring finger, I made another decal. I used the Christmas bulb from BM225, using only the circular shape of the bulb. I used a yellow from The New Black's Runway collection, and then added Funky Fingers "Lil Miss Sunshine" to give the moon some depth. I really like how the moon turned out :)
The bats are from Bundle Monster stamps #BM13. I used a portion of a stamp from #BM224 on my pinky and thumb that looks like branches. I used #BM13 again to create the spider and web on my thumb.
Finally, I was pleasantly surprised when I went to bed last night - my nails were glowing!!! I am going to try to get a pic :)

Wednesday, October 22, 2014

Walking Dead Nails

Out of all the nail art I have done (so far), I would have to say these are probably my favorite. First and foremost, I must state that I cannot take credit for this design. I had someone make a request for a set of Walking Dead nails, so I did a search. I am not personally a Walking Dead fan, so I wasn't really "feeling" the theme and desperately needed some inspiration. When I saw this from CopyCat Claws, I knew this was the design I wanted to do with.  You can read her article on how to achieve this look - I followed her script pretty closely, except that I stamped the hands on with a Bundle Monster plate (BM-H08). 

My client was thrilled. When I posted them on my Instagram account, I was estatic to get a comment from Rob Nguyen (from the Nailed It show) - ok maybe not exactly a comment but it was recognition!


Sunday, October 19, 2014

This Sh*t is Bananas!


I was blessed to win a giveaway in which I received 3 small Indigo Bananas polishes of my choice, along with a cuticle balm. One of my three pics was Perfect Night - a purple jelly with blue flakies. This is flippin' gorgeous!!!! I have gotten more complements on this polish than any other I have worn. I added some rhinestones, pearls and caviar beads, and stamped a couple nails with plate BM502 from the Sunkissed Bundle Monster collection. I just love the blue and purple together. I apologize that my picture sucks (I am working on that, I swear!) - you can't tell how amazing this color is.

Wednesday, October 15, 2014

October is Breast Cancer Awareness Month


I had a more detailed mani in mind, but every time I would sit down to work on it, something would go wrong -- one time a stink bug landed on my pinky and drug his nasty little legs through my wet polish. After 3 tries, I gave up and decided to go with something simple. I painted the base with Nicole by OPI in "Still into Pink." This is a matte polish, and I wanted to love it, but I needed something a little more, so  I added a thin coat of Wet N Wild "Break the Ice" to add just a little shimmer. I popped on some rhinestones for the bow, added a few hearts, and there you have it!

Tuesday, October 7, 2014

Inspired by ... Tarte


Today's mani is inspired by the packaging for the Tarte Rainforest After Dark palette.
I started with Kleancolor in Neon Purple, and stamped the snakeskin pattern (BM224) with LA Colors in Reckless. The snake is from Winstonia plate W03, and it's stamped with Sally Hansen Insta-Dri in Style Steel.  I am also sporting a new nail shape - I am working myself into an almond shape.

 I LOVE this mani. It turned out rockin'. :) The pics could be better, but I am working on that.

Wednesday, October 1, 2014

Purple is my Passion

I love purple. The majority of my wardrobe and my surrounding elements are purple. My hair has been purple on several occasions. If I had a quarter for every person I wanted to slap when they said "gee, do you like purple? (insert dorky smile)" - I would be set. This mani was done with The New Black's purple ombre set.  There were 5 small bottles, so each finger got it's own shade. I went back through, reversing the color pattern, and stamped each nail with MoYou's Pro Collection #12 plate.  The result: not bad for some nubs! Vive la Violet!

Monday, September 29, 2014

Today's 5Below Haul!


If you don’t have a 5Below store near you, I am very sorry. I LOVE this store. I cannot leave without nail polish. Along with a bunch of bow cabochons and nail sequins, I grabbed up 4 bottles. The Fresh Paint is called “Winning” - it’s a nice earthy green color. I can definitely see using that for nail art. Next up (wer’e going left to right, here!) is Funky Fingers “Dia De Muertos.” This cool blue jelly is chock-full of pink and blue glitter, and it even glows in the dark. Yay! FF “Fireworks” is a polish I have been eyeing. I will definitely use that next 4th of July. Fireworks is a clear polish with red, white and blue glitters, in a variety of sizes. Very cute topper. Last is FF “Varsity Blue.” This is another clear topper with black, blue and white glitter in 2 different sizes. I have oh so many mani ideas for these! 

Sunday, September 28, 2014

Fall Trees


Today’s mani has been inspired by the view from my desk window. 
The base is Fresh Paint in “Firefly.” I sponged the grass on with Fresh Paint “Pistachio” and LA Colors “Spring Frost.” The tree stamp is from Bundle Monster  #BM409, and the polish I used was NOPI “Promises in the Dark.” Finally, I put a light topcoat on the tree branches, and added some glitter in red, brown, yellow and orange. I sealed in everything with NYC’s “Grand Central Station” - after reading some reviews on a Facebook group, I am giving it a try. I am pretty pleased with how they turned out :)

Friday, September 26, 2014

Inspired by Robin Moses

If you don't know who Robin Moses is, and you are a nail art fan, you must google her now. Go. I will wait. 


Welcome back. She is .....tha shit...... Right?!?! Right. Besides the fact that her art is stupendous and she is creating these amazing videos to teach us for free, she is an amazing person. Kind. Thoughtful. Humble. I love her. She is the reason I decided to make myself a plan to make nail art more than just a hobby for me. 

Here's my nail art wheel that I created with Robin's tutorials.

If you haven't already, be sure to Like her Facebook page.  And while you are at it, subscribe to her YouTube page as well. I promise you will not regret it.

Thursday, September 25, 2014

Flyaway Flowers

This was another set I made to put on Listia. Inspired by my favorite time of year, Spring, I painted the base with Funky Fingers "Mrs Mint." I then stamped two layers of grasses with Fresh Paint in "Pistachio" (which can't be seen very well) and Fresh Paint "Spruce Street." The flower petals are fimo slices, with rhinestones in the centers. Each fluttering petal is trailed by a path of carefully placed iridesent glitter.

Wednesday, September 24, 2014

Down the Rabbit Hole

A set of nails I did for Listia, on an Alice in Wonderland theme. These were lots of fun to do! 
 I used rabbit, rose and playing card fimo, as well as black, white and red rhinestones. I also placed small pieces of iridescent glitter on each nail.

Tuesday, September 23, 2014

Born Pretty Water Decals - review


I received some floral water decals from the Born Pretty Store to review.  The decals are squares, as opposed to being nail-shaped. This allows you to use them to cover the entire nail, or cut out specific portions to use. I painted my nails with Kleancolor’s “Pastel Teal” to start.
On my first attempt, I decided to cut the entire square and place it on the nail. I painted my topcoat over it, and once it dried, I trimmed the edges. This method worked ok, but the edges looked a little ragged to me. 
For my second attempt, I decided to cut the square into a nail shape. I then applied the water decal, filed off the edge, and topcoated the nail. This method seemed to be less cumbersome, but I also suck at cutting anything straight/even. 
I threw on some rhinestones for the few nails that I didn’t apply the decals, and decided to edge the decals with some glitter (to cover up my rugged edges!). 
I LOVE the design. I love the colors. The water decal itself was a little more difficult for me than I thought it would be initially, but it got easier as I went along. You can get these decals at the Born Pretty Store here, but be sure to use code TTHEX31 to get a 10% discount! 

Sunday, September 21, 2014

Upcycled nails


Do you ever do your nails, and in a couple of hours you hate them? Ok, hate is a strong word - how about greatly dislike. I started with my nails like this. I repainted my ring fingers, and stamped all my nails with MoYou Pro 12. I used MoYou Suki 02 to make the flower decals. And now I am back to loving my nails :)

Saturday, September 20, 2014

Inspired by Allure Nail


I am obsessed with nail art on Pinterest. You can see my collection of awesomeness here.  Anyway, I found this amazing design which inspired me to do the above mani. It was originally done by Allure Nail - see the original post here. I wasn’t sure I was going to like the negative half-moons, but I feel like it makes my nails look longer. I used Essie’s Blanc as my white base, then added a coat of WnW’s Break the Ice to give just a little bit of shimmer. Then I sponged some green, blue and purple randomly. I edged the half-moons with gold and added a few gold lines. The butterflies were stamped with Pueen plate #PUEEN39. A little gold and purple glitter, and Viola! Kickass mani. Love it!

Thursday, September 18, 2014

Coconut up your …what?!?!

If you want to waste 3 minutes of your life, you can watch this video. It really makes me think about how entertainment has evolved. Otherwise, I will give you the short version: a little red alien/bug thing sits on a coconut, and they make a song about it. Strange. Stupid. Waste of brain cells.  I jokingly said “I should put that on my nails!” and my son said “no! you are not allowed!” - - challenge accepted. Rule #1: NEVER tell a woman what she cannot do. 
This mani was done quickly, I will admit, with less effort than I normally give. Whatever. I used Funky Fingers "Mrs. Mint" for the base, and stamped the lines with Sally Hansen InstaDri in "Mint Sprint," BM plate #BM301. I free-handed the coconuts with SH "Terracotta", and added some light ivory wisps. I did the little buggy guy with my Nail Candy nail pens. 
When I showed my nails to my son, he just shook his head and walked away. Score 1 for mom. :)

Wednesday, September 17, 2014

Watercolor Trees


This mani was inspired by a picture from Pinterest. (You can see the pic here.) I decided that whining about summer being gone was useless, as I was missing being able to enjoy fall. So here we go - yay for fall, hooded sweatshirts and bonfires!
Polishes used:
The base is Essie “Blanc.” For the trees, I used some no-name black striper. The watercolor background and leaves were done in Wet N Wild “I Red a Good Book,” Sally Hansen “Mellow Yellow,” Sally Girl “Surf’s Up” (green), Sally Hansen “Blue Me Away!” and LA Colors “Reckless.”
There are multitudes of people who have tutorials on the watercolor method, so I am not going to explain it - you can easily Google it. 

Tuesday, September 16, 2014

Funky Fingers “Olaf”

I was very excited to try my new Funky Fingers polishes. I painted the base purple (Essie "Play Date"), and randomly painted on blue (Salon Perfect "Baby Blues") and pink (Milani "Tip Toe Pink"). I topped it with the new FF in "Olaf," which contains iridescent micro glitter as well as small white glitters. My finishing touch was a kitty stamped on my ring finger (MoYou Princess collection #3). I sealed it all in with Poshe topcoat, even though I didn’t feel like I had to have it ~ Olaf was pretty thick. ;)

Monday, September 15, 2014

Born Pretty Store nail decals

I have to say, I LOVE the new decals I got from the Born Pretty Store. I started with two coats of Zoya’s "Daul", and then laid on the stickers, sealing them in with two coats of Poshe topcoat. In hindsight, I wish I would have used a darker color, to show off the decals better. They are easy to remove from the paper, easy to apply, and gorgeous! More than that, you get TONS! Typically, with most decals/stickers/nail decor in general, you only get enough for a mani or two. In this set, you get 56 decals ~ that’s enough for 4 full manis, plus more! AWESOME!! You also get the fringed/scalloped decor as well. In case you hadn’t guessed, I am SUPER happy with these! You can find the decals here, and the awesome midi ring (also from Born Pretty) here. Both the decals and ring also come in goldtone. 
But wait, there’s more! Use discount code TTHEX31 and get 10% off their already amazing prices!
Be sure to check out the Born Pretty Store today!!!!

Sunday, September 14, 2014

New Bundle Monster Sun Kissed plates


Summer is not gone yet! I keep telling myself that. I decided a good beach-inspired mani would keep me in the summer spirit - plus I just received my new plates from Bundle Monster! You can check them out here. For a limited time you can get the set of 10 for only $7.99! 
Here’s the breakdown:
Pinky finger: Base is Essie “Blanc.” Stamped the gold tritons (you can barely see them) with ELF “Pot of Gold and BM-509. Directional circle is from plate BM-507 and Salon Express black.  There is a small black rhinestone in the center of the circle.
Ring finger: Base is a beige from The New Black’s Runway collection. I used the Salon Express black again to stamp the palm trees from BM-510.
Middle finger: Base is Kleancolor “Sheer Pastel Pink.” Shells are plate BM-505 and I used Salon Express white. I need a brighter white. 
Index finger: Base is Fresh Paint “Firefly.” Waves are stamped with Salon Perfect “Baby Blues” and BM-509. Mermaid is Salon Express black and BM-510. I added a few small pieces of glitter for “bubbles.”
Thumb: Used The New Black again, and stamped with Salon Express white. BM-505.
I am pretty pleased with how this turned out; I just wish the white shells would have shown up better. Guess it’s time to invest in a better white - but the question is Konad or Mundo de Unas? Also, I wish I would have used a small gold stud in the center of the directional circle, instead of the black rhinestone. You can’t see it.  You can, however, see the cat hair on my thumb in the last picture. That is Bullet’s contribution - he worked so hard sleeping next to me, I felt awful taking it off. Not really, but we have 8 cats, so hair is an accessory. Maybe one day I will do cat hair nails...

Saturday, September 13, 2014

K.I.S.S. mani (Keep It Simple Stupid!)

Something quick and easy! I used a pink from the New Black pink ombre kit, and topped it with Funky Fingers "Saved by the Glitter." For a final touch, I added some blue nail studs.

Friday, September 12, 2014

Born Pretty Store stamping plate QA61

The second I saw this plate, I knew I had to have it. The coordinated floral designs are perfect for leadlighting!
I painted my accent nails with Fresh Paint in "Pistachio" If you’ve never seen Fresh Paint before, you can get it at Five Below. The images stamped cleanly and easily. To fill in the images I used LA Colors in "Spring Frost" (green), Essence in "Breakthrough" (purple), and Funky Fingers in "Aloha!" (hot pink). I used those same colors for the rest of my nails, and used some little metal studs. 
I LOVE THIS STAMP. I usually never do the same design twice on my nails, but this one will definitely be used repeatedly. The design ideas are endless. You can get the QA61 plate here and the metal studs here.  Don’t forget to use code TTHEX31 to get 10% off!

Thursday, September 11, 2014

Cosmic Kitties & Welcome!


This is my first post on Blogger. If you are reading this, thanks for taking the time to stop by! I guess I will write an intro about myself eventually, but nail art is more interesting than me, so let's move on :)

Today’s mani is a depiction of something that rarely ever happens - the idea in my head actually looks like what is on my nails. What a nice change! :)
I used Essence “Hello Marshmallow!” as my base, and did a double stamping of the wavy image on plate m69. I really didn’t intend to do a double stamp, but the first blue I used (Kleancolor “Pastel Blue”) wasn’t very dark, so I overlaid it with Salon Perfect “Baby Blues.” The little stars are from stamp m14, with Essie “Blanc.” Lastly, I used cat water decals from Bundle Monster for my Cosmic Kitty look. I finished off with Poshe Topcoat.  
I was pretty impressed with the decals from Bundle Monster - you can see them here. I thought I was only getting one sheet, but I was pleasantly surprised with all three! For under $2, it was definitely a bargain. 

Friday, February 14, 2014

Happy VD

This was my V-Day mani for 2014. I used the End It Movement polish (created by Sonoma Nail Art) I won in a giveaway, stamped with BM412 and BM411. Sonoma makes some kickass Indie polishes -- check her Etsy page here! This polish is special because it was designed to bring attention to human slavery that still exists today.