Monday, September 29, 2014

Today's 5Below Haul!


If you don’t have a 5Below store near you, I am very sorry. I LOVE this store. I cannot leave without nail polish. Along with a bunch of bow cabochons and nail sequins, I grabbed up 4 bottles. The Fresh Paint is called “Winning” - it’s a nice earthy green color. I can definitely see using that for nail art. Next up (wer’e going left to right, here!) is Funky Fingers “Dia De Muertos.” This cool blue jelly is chock-full of pink and blue glitter, and it even glows in the dark. Yay! FF “Fireworks” is a polish I have been eyeing. I will definitely use that next 4th of July. Fireworks is a clear polish with red, white and blue glitters, in a variety of sizes. Very cute topper. Last is FF “Varsity Blue.” This is another clear topper with black, blue and white glitter in 2 different sizes. I have oh so many mani ideas for these! 

Sunday, September 28, 2014

Fall Trees


Today’s mani has been inspired by the view from my desk window. 
The base is Fresh Paint in “Firefly.” I sponged the grass on with Fresh Paint “Pistachio” and LA Colors “Spring Frost.” The tree stamp is from Bundle Monster  #BM409, and the polish I used was NOPI “Promises in the Dark.” Finally, I put a light topcoat on the tree branches, and added some glitter in red, brown, yellow and orange. I sealed in everything with NYC’s “Grand Central Station” - after reading some reviews on a Facebook group, I am giving it a try. I am pretty pleased with how they turned out :)

Friday, September 26, 2014

Inspired by Robin Moses

If you don't know who Robin Moses is, and you are a nail art fan, you must google her now. Go. I will wait. 


Welcome back. She is .....tha shit...... Right?!?! Right. Besides the fact that her art is stupendous and she is creating these amazing videos to teach us for free, she is an amazing person. Kind. Thoughtful. Humble. I love her. She is the reason I decided to make myself a plan to make nail art more than just a hobby for me. 

Here's my nail art wheel that I created with Robin's tutorials.

If you haven't already, be sure to Like her Facebook page.  And while you are at it, subscribe to her YouTube page as well. I promise you will not regret it.

Thursday, September 25, 2014

Flyaway Flowers

This was another set I made to put on Listia. Inspired by my favorite time of year, Spring, I painted the base with Funky Fingers "Mrs Mint." I then stamped two layers of grasses with Fresh Paint in "Pistachio" (which can't be seen very well) and Fresh Paint "Spruce Street." The flower petals are fimo slices, with rhinestones in the centers. Each fluttering petal is trailed by a path of carefully placed iridesent glitter.

Wednesday, September 24, 2014

Down the Rabbit Hole

A set of nails I did for Listia, on an Alice in Wonderland theme. These were lots of fun to do! 
 I used rabbit, rose and playing card fimo, as well as black, white and red rhinestones. I also placed small pieces of iridescent glitter on each nail.

Tuesday, September 23, 2014

Born Pretty Water Decals - review


I received some floral water decals from the Born Pretty Store to review.  The decals are squares, as opposed to being nail-shaped. This allows you to use them to cover the entire nail, or cut out specific portions to use. I painted my nails with Kleancolor’s “Pastel Teal” to start.
On my first attempt, I decided to cut the entire square and place it on the nail. I painted my topcoat over it, and once it dried, I trimmed the edges. This method worked ok, but the edges looked a little ragged to me. 
For my second attempt, I decided to cut the square into a nail shape. I then applied the water decal, filed off the edge, and topcoated the nail. This method seemed to be less cumbersome, but I also suck at cutting anything straight/even. 
I threw on some rhinestones for the few nails that I didn’t apply the decals, and decided to edge the decals with some glitter (to cover up my rugged edges!). 
I LOVE the design. I love the colors. The water decal itself was a little more difficult for me than I thought it would be initially, but it got easier as I went along. You can get these decals at the Born Pretty Store here, but be sure to use code TTHEX31 to get a 10% discount! 

Sunday, September 21, 2014

Upcycled nails


Do you ever do your nails, and in a couple of hours you hate them? Ok, hate is a strong word - how about greatly dislike. I started with my nails like this. I repainted my ring fingers, and stamped all my nails with MoYou Pro 12. I used MoYou Suki 02 to make the flower decals. And now I am back to loving my nails :)

Saturday, September 20, 2014

Inspired by Allure Nail


I am obsessed with nail art on Pinterest. You can see my collection of awesomeness here.  Anyway, I found this amazing design which inspired me to do the above mani. It was originally done by Allure Nail - see the original post here. I wasn’t sure I was going to like the negative half-moons, but I feel like it makes my nails look longer. I used Essie’s Blanc as my white base, then added a coat of WnW’s Break the Ice to give just a little bit of shimmer. Then I sponged some green, blue and purple randomly. I edged the half-moons with gold and added a few gold lines. The butterflies were stamped with Pueen plate #PUEEN39. A little gold and purple glitter, and Viola! Kickass mani. Love it!

Thursday, September 18, 2014

Coconut up your …what?!?!

If you want to waste 3 minutes of your life, you can watch this video. It really makes me think about how entertainment has evolved. Otherwise, I will give you the short version: a little red alien/bug thing sits on a coconut, and they make a song about it. Strange. Stupid. Waste of brain cells.  I jokingly said “I should put that on my nails!” and my son said “no! you are not allowed!” - - challenge accepted. Rule #1: NEVER tell a woman what she cannot do. 
This mani was done quickly, I will admit, with less effort than I normally give. Whatever. I used Funky Fingers "Mrs. Mint" for the base, and stamped the lines with Sally Hansen InstaDri in "Mint Sprint," BM plate #BM301. I free-handed the coconuts with SH "Terracotta", and added some light ivory wisps. I did the little buggy guy with my Nail Candy nail pens. 
When I showed my nails to my son, he just shook his head and walked away. Score 1 for mom. :)

Wednesday, September 17, 2014

Watercolor Trees


This mani was inspired by a picture from Pinterest. (You can see the pic here.) I decided that whining about summer being gone was useless, as I was missing being able to enjoy fall. So here we go - yay for fall, hooded sweatshirts and bonfires!
Polishes used:
The base is Essie “Blanc.” For the trees, I used some no-name black striper. The watercolor background and leaves were done in Wet N Wild “I Red a Good Book,” Sally Hansen “Mellow Yellow,” Sally Girl “Surf’s Up” (green), Sally Hansen “Blue Me Away!” and LA Colors “Reckless.”
There are multitudes of people who have tutorials on the watercolor method, so I am not going to explain it - you can easily Google it. 

Tuesday, September 16, 2014

Funky Fingers “Olaf”

I was very excited to try my new Funky Fingers polishes. I painted the base purple (Essie "Play Date"), and randomly painted on blue (Salon Perfect "Baby Blues") and pink (Milani "Tip Toe Pink"). I topped it with the new FF in "Olaf," which contains iridescent micro glitter as well as small white glitters. My finishing touch was a kitty stamped on my ring finger (MoYou Princess collection #3). I sealed it all in with Poshe topcoat, even though I didn’t feel like I had to have it ~ Olaf was pretty thick. ;)

Monday, September 15, 2014

Born Pretty Store nail decals

I have to say, I LOVE the new decals I got from the Born Pretty Store. I started with two coats of Zoya’s "Daul", and then laid on the stickers, sealing them in with two coats of Poshe topcoat. In hindsight, I wish I would have used a darker color, to show off the decals better. They are easy to remove from the paper, easy to apply, and gorgeous! More than that, you get TONS! Typically, with most decals/stickers/nail decor in general, you only get enough for a mani or two. In this set, you get 56 decals ~ that’s enough for 4 full manis, plus more! AWESOME!! You also get the fringed/scalloped decor as well. In case you hadn’t guessed, I am SUPER happy with these! You can find the decals here, and the awesome midi ring (also from Born Pretty) here. Both the decals and ring also come in goldtone. 
But wait, there’s more! Use discount code TTHEX31 and get 10% off their already amazing prices!
Be sure to check out the Born Pretty Store today!!!!

Sunday, September 14, 2014

New Bundle Monster Sun Kissed plates


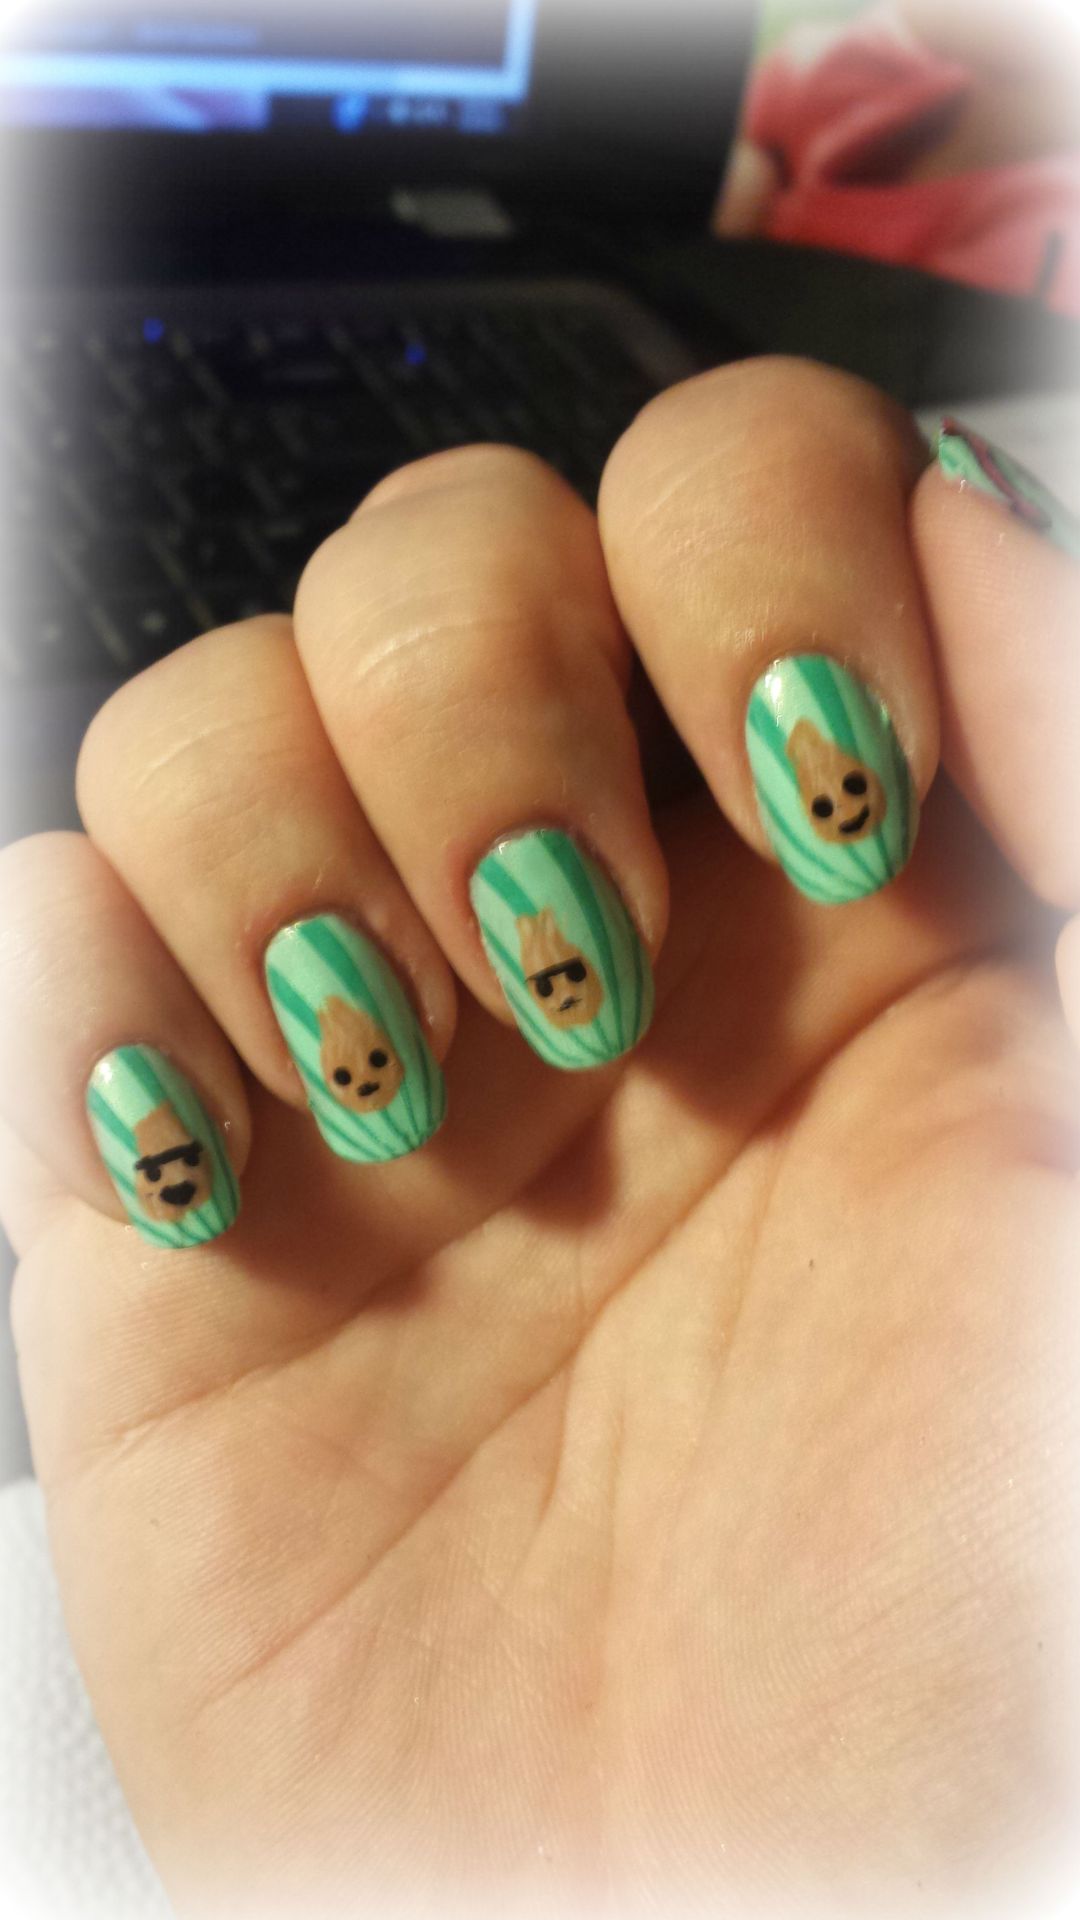
Summer is not gone yet! I keep telling myself that. I decided a good beach-inspired mani would keep me in the summer spirit - plus I just received my new plates from Bundle Monster! You can check them out here. For a limited time you can get the set of 10 for only $7.99! 
Here’s the breakdown:
Pinky finger: Base is Essie “Blanc.” Stamped the gold tritons (you can barely see them) with ELF “Pot of Gold and BM-509. Directional circle is from plate BM-507 and Salon Express black.  There is a small black rhinestone in the center of the circle.
Ring finger: Base is a beige from The New Black’s Runway collection. I used the Salon Express black again to stamp the palm trees from BM-510.
Middle finger: Base is Kleancolor “Sheer Pastel Pink.” Shells are plate BM-505 and I used Salon Express white. I need a brighter white. 
Index finger: Base is Fresh Paint “Firefly.” Waves are stamped with Salon Perfect “Baby Blues” and BM-509. Mermaid is Salon Express black and BM-510. I added a few small pieces of glitter for “bubbles.”
Thumb: Used The New Black again, and stamped with Salon Express white. BM-505.
I am pretty pleased with how this turned out; I just wish the white shells would have shown up better. Guess it’s time to invest in a better white - but the question is Konad or Mundo de Unas? Also, I wish I would have used a small gold stud in the center of the directional circle, instead of the black rhinestone. You can’t see it.  You can, however, see the cat hair on my thumb in the last picture. That is Bullet’s contribution - he worked so hard sleeping next to me, I felt awful taking it off. Not really, but we have 8 cats, so hair is an accessory. Maybe one day I will do cat hair nails...

Saturday, September 13, 2014

K.I.S.S. mani (Keep It Simple Stupid!)

Something quick and easy! I used a pink from the New Black pink ombre kit, and topped it with Funky Fingers "Saved by the Glitter." For a final touch, I added some blue nail studs.

Friday, September 12, 2014

Born Pretty Store stamping plate QA61

The second I saw this plate, I knew I had to have it. The coordinated floral designs are perfect for leadlighting!
I painted my accent nails with Fresh Paint in "Pistachio" If you’ve never seen Fresh Paint before, you can get it at Five Below. The images stamped cleanly and easily. To fill in the images I used LA Colors in "Spring Frost" (green), Essence in "Breakthrough" (purple), and Funky Fingers in "Aloha!" (hot pink). I used those same colors for the rest of my nails, and used some little metal studs. 
I LOVE THIS STAMP. I usually never do the same design twice on my nails, but this one will definitely be used repeatedly. The design ideas are endless. You can get the QA61 plate here and the metal studs here.  Don’t forget to use code TTHEX31 to get 10% off!

Thursday, September 11, 2014

Cosmic Kitties & Welcome!


This is my first post on Blogger. If you are reading this, thanks for taking the time to stop by! I guess I will write an intro about myself eventually, but nail art is more interesting than me, so let's move on :)

Today’s mani is a depiction of something that rarely ever happens - the idea in my head actually looks like what is on my nails. What a nice change! :)
I used Essence “Hello Marshmallow!” as my base, and did a double stamping of the wavy image on plate m69. I really didn’t intend to do a double stamp, but the first blue I used (Kleancolor “Pastel Blue”) wasn’t very dark, so I overlaid it with Salon Perfect “Baby Blues.” The little stars are from stamp m14, with Essie “Blanc.” Lastly, I used cat water decals from Bundle Monster for my Cosmic Kitty look. I finished off with Poshe Topcoat.  
I was pretty impressed with the decals from Bundle Monster - you can see them here. I thought I was only getting one sheet, but I was pleasantly surprised with all three! For under $2, it was definitely a bargain.