Showing posts with label #Kleancolor. Show all posts

Sunday, March 22, 2015

Funky Fingers "Dia de Muertos"

Happy Spring! It's finally here! Nevermind that it snowed here on the first day of spring :(  I can only suppose Mother Nature was letting Winter have a final hurrah.
Ulta had Dermelect polish in the clearance bin for $.97, so I picked up a few to try. I used Dermelect "Above It" for my base. This looked more like a baby blue in the bottle, but on my nails it looks more periwinkle. Whatever - I like it :)
 I decided to use one of my untrieds, Funky Fingers "Dia de Muertos" on my ring finger and thumb. "Dia" (pictured) is a blue-tinted glitter topper. AND - guess what - it glows! It is nice to realize this ahead of time, so you don't scare yourself like I did. As I was climbing into bed, I saw something glowing out of the corner of my eye, and startled myself for a second before realizing that I am a dumbass and it was just my nails. I'm not really sure what I was thinking during that few seconds of panic, but it definitely got my heart racing.
I stamped my pinky with Kleancolor "Neon Aqua" and Born Pretty stamping plate #BP21. To keep the pink/blue theme going, I added some pink dots with my dotting tool and Ruby Wing "Groupie."
For my middle finger, I used a tip design guide from Kiss as a stencil, and painted over the nail with "Groupie." I really like the tip guides because you can do so much more with them than just french tips. Just be sure to pull off the guide carefully before the polish dries!
The pointer is double stamped with  Bundle Monster plate #BM201 and another Born Pretty plate, #BP10. I am really loving the new Born Pretty plates - not only do they have great designs and quality plates, you can't beat their pricing! You can check out the Born Pretty Store here.

Wednesday, March 4, 2015

Petal Tips

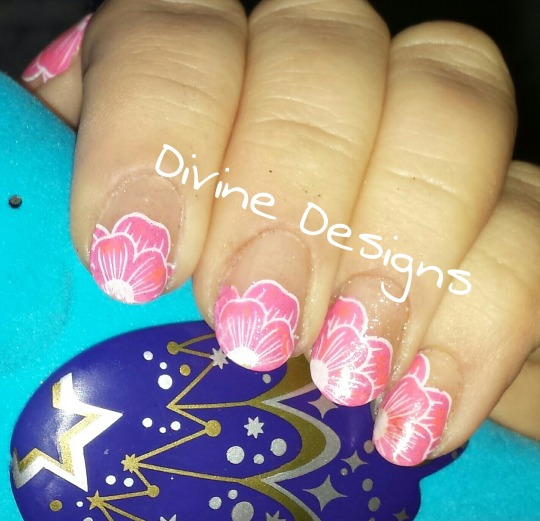
I received my order of Gelibility and was dying to try it! This stuff really is amazing. Previously, I had no desire to make the switch to gel polish. I like to change my polish often, and I have hundreds of bottles of regular polish that I have no intention of just leaving on a shelf. Is it weird that I have an emotional bond with my nail polish? Probably. Anyway, if you are saying "WTF is Gelibility?" right about now, fear not, for I will tell you. Gelibility is a product that you mix with regular nail polish and cure with a lamp to achieve your own DIY gel mani. Pretty freaking awesome, huh?!?

The Gelibility kit comes with two bottles - Stick It! and Fix It! You apply the Stick It" as your base/bonder. Cure. Then you mix your polish with the Fix It! in a small container or palette.( I ordered this one along with some brushes from Bundle Monster.) The instructions say to start mixing 50/50, but that you may need to adjust the amount. I did 50/50 and it worked fine for me, but I was using a sheer polish. I used Kleancolor "Sheer Pastel Nude" - I chose this color because even though you can't really see the color, it makes a nice, clean background for nail art.  This way I can change my art (using non- acetone to take off the regular polish that I am using for nail art) as many times as I like while preserving the gel mani.

I created decals using Winstonia plate #W04 and Sally Hansen Insta Dri in "Fuchsia Flare" and Funky Fingers "Gesso." I decided I wanted to add another color onto the flower petals, so
I used a salmon striper to dot in some color here and there. Finally, a coat of Essie Luxe Effects "Pure Pearfection" gave the mani a slight sheen and shimmer.

I am so excited at the possibilities that Gelibility opens for me! This is definitely an impressive product! :)

Sunday, February 15, 2015

Conversation Hearts


Happy VD! The best thing about today is that chocolate is on sale tomorrow! Yay!

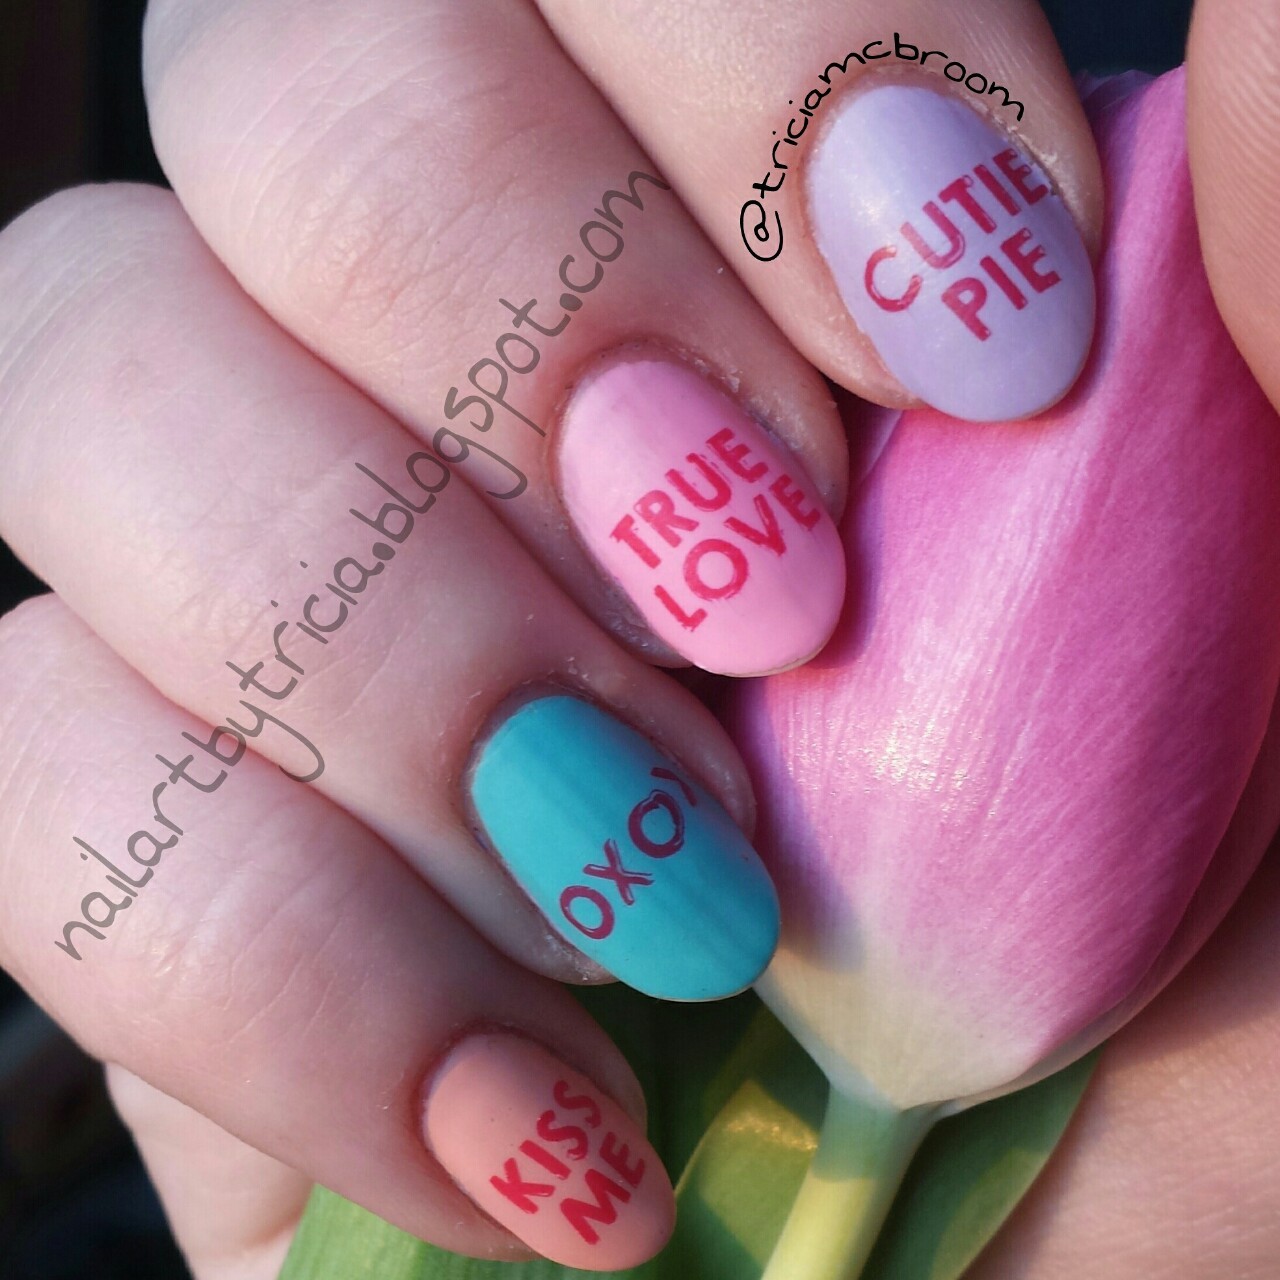
My last VD mani for the year is conversation hearts. I used a variety of pastel polishes from Kleancolor and Essie, and stamped with Kleancolor "Red" using Bundle Monster plate #BM425. Finally, I covered them all with a matte topcoat. Simple and cute.


Friday, February 6, 2015

V-Day mani

It's that time of year again when everyone scrambles to buy some shit to try to tell their loved ones they are loved. Eh, the nail art is cute anyway.

For today's mani I used Zoya's "Dot" for my base, and Sonoma Nail Art's Limited Edition #enditmovement polish on my ring finger for an accent. I used a variety of plates on this mani, so get ready:
 - the pinky is from the Pueen Love Elements Collection, plate #PUEEN29
 - middle finger and pointer are from Bundle Monster, plate #BM411
 - the thumb is another Pueen, #PUEEN43
I used Salon Express in "Black" and Kleancolor's "Red" for my stamping.

In other news, I officially started beauty school today :) My Asthetics course is first, and then on to Nail Technology.

Thursday, January 29, 2015

Cat Hair Nails


I’ve gotten pretty good at recreating other people’s work, but I want to be more than just a copycat artist.  This year I have decided to focus on trying to do more of my own original designs. I wanted to do something completely out of the box, but wasn’t exactly sure what. I follow a gazillion talented bloggers, but one that sticks out in my mind for originality is PiggieLuv – particularly her amazing manis done with flocking powder, cork, and otherout-of-the-ordinary mediums.  One day it hit me – I want to do a mani with cat hair. Yes, real cat hair.

I have cats. Plural. All rescues. They love to lay on my stuff, and get their hair everywhere. They puke up hairballs on my desk. They drive me insane sometimes, but I wouldn’t trade them for the world. No cats were harmed in the making of this mani. Three of them purred profusely when I “borrowed” some of their hair. 

After I painted each nail with the background color, I began the process of hair collection. First up was Smeagle, my Sphynx. He is what breeders refer to as a “peach fuzz” Sphynx, as opposed to a “rubber bald’”  -  ie, he has a little bit of hair. All I had to do was give him a good rubdown, and my hand was covered in his fuzzies. The base skin tone color is two coats of  KleanColor “Sheer Pastel Nude” with a coat of “Sheer Pastel Pink” over it. I put a matte topcoat on the nail and pressed the hair down. Not too bad. I trimmed up the sides and beamed at my Smee nail.

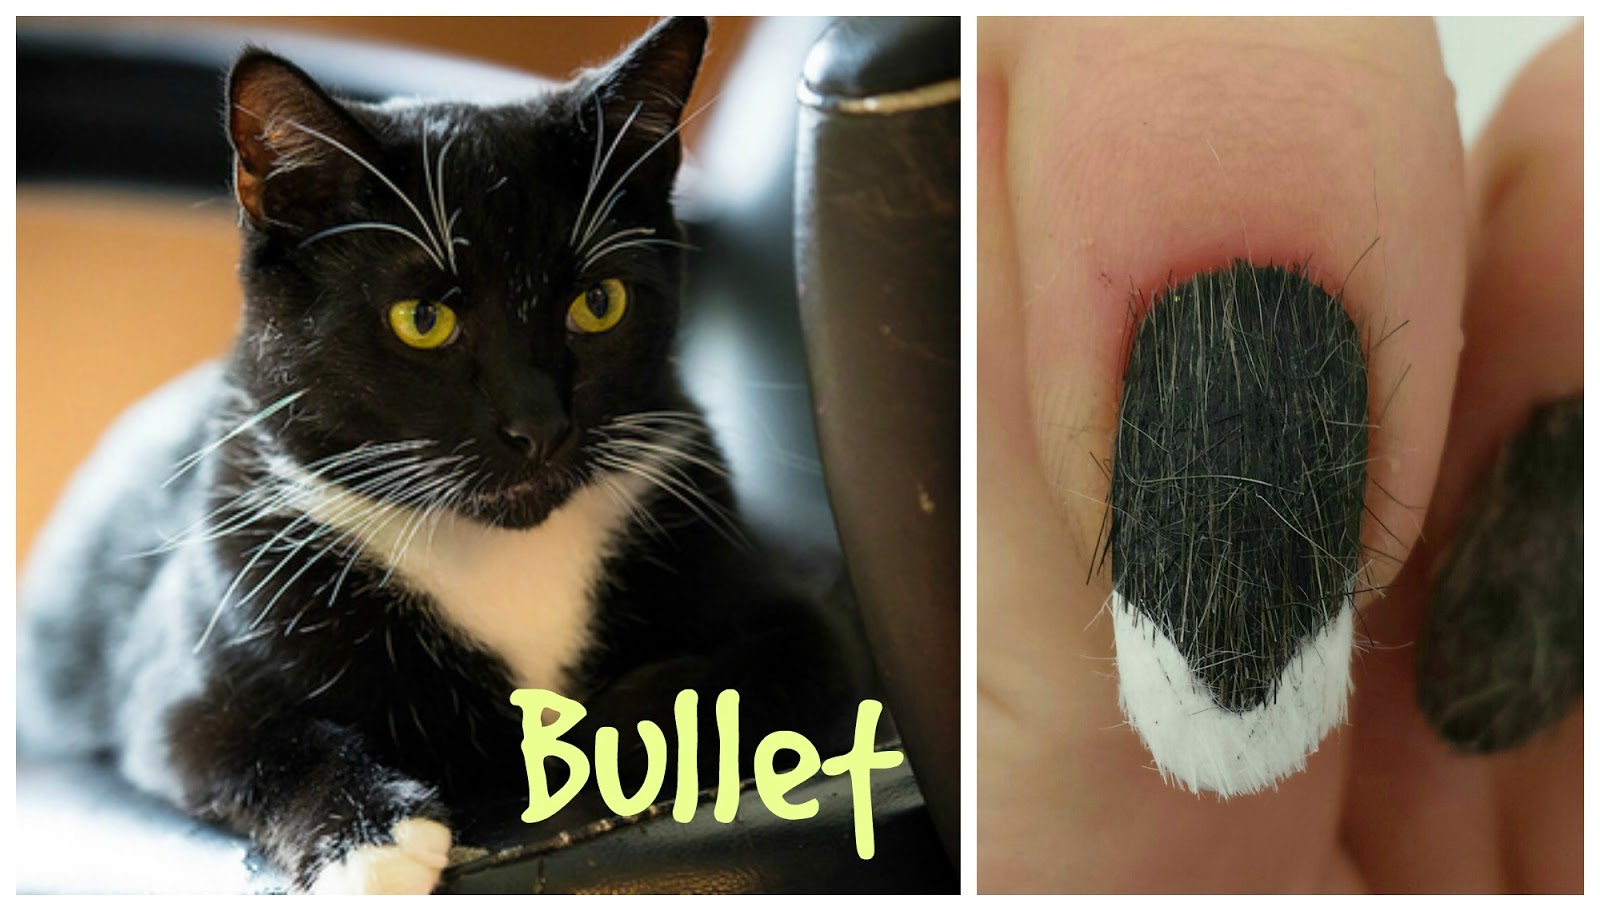
I decided my next nail would be modeled after Bullet, our male black and white kitty. I used Wet Wild "Lights Out" and "Whipped Topping" to create a tip on the nail, similar to Bullet's collar.  He laid on his back and purred as he enjoyed his brush-down. 
 I wasn’t so lucky with Grenade, Bullet’s brown tabby brother, so I used some scissors to snip a little pinch of fur from under his leg. A little catnip and I was forgiven. I used LA Colors "Whipped" and NOPI "Promises in the  Dark" with some light sponging of the black polish to make the brown tabby pattern. 
The ring finger is modeled after one of my Lykoi boys, Pink.  I used the same Kleancolor polishes for the skin tone, and LA Colors "Lost Soul" for the gray pigmentation. You are probably saying “WTF is a Lykoi!?!” right now – click here J I fell in love with him and his brother at the shelter. I realize he isn’t what most people would describe as a cute cat – and I am totally ok with that. I fell in love with his personality, not his looks.  To me, he is beautiful inside and out.

Finally, my pinky nail is modeled after Picasso, the Cat Who Thinks He is a Dog. Really.

 The process of laying down the matte coat, applying the hair, and then trimming, was a little more laborious than I expected. For the first time ever I was putting hair on my mani instead of trying to pull hair off, and it just felt very strange. I debated on sealing the hair in with a topcoat, but I really like the 3D effect of the hair.


My husband said my nails are disgusting. I think the word "unsanitary" may have come up.  My son just shook his head and told me I was strange. I am anticipating comments stating the like, and I look forward to showing them to my hubby to reinforce the fact that IDGAF .

Thursday, December 11, 2014

Trees and Balls - oh what fun!

My little tornado has been ill, so I needed a quick and easy mani for my son's holiday band concert. Since my pinky patch did not survive, I felt it best to have a pity party and then cut down all my nails :(

For the base I used Funky Fingers "Mrs Mint" and Funky Fingers (the tag fell off so I have no idea what the name is!) green on the ring finger. I used my dotting tools along with Kleancolor "Red," Kleancolor "White" and Funky Fingers green-with-no-name to create the dotted look. For the trees, I created little triangles with striping tape, and added more tape diagonally and horizontally to get the criss-crossed look. One coat of "Mrs Mint" and a dot of white on the top, and voila! Easy cute holiday mani.  I really like the striping tape Christmas tree - I have seen it around on Pinterest, Bloglovin, etc. Have you tried the tree design yet? What did you think?

Wednesday, October 29, 2014

Halloween Skittles! Part I


Halloween is always a fun time of year for nail art peeps. There are so many cute ideas! I couldn't pick just one, so I decided to mix it up with a Skittle mani. I used 6 different stamps and 18 polishes, so I'm going to be breaking this up into 2 posts.


  •     I painted my thumb with NOPI "Always a Silver Lining" and stamped the adorable "Scary" stamp from My Online Shop stamp MJ#XXII. I sponged on a light black glitter polish (WnW Fergie "Rock N' Roll") around the stamp.
  •     The pointer is painted with Kleancolor "Neon Purple" and stamped with Salon Express white using stamp #m13. 
  •    My middle finger is a base of Essie (sorry no name on it), topped with Funky Fingers "Varsity Blue." I really like this glitter topper; it was too pretty to put anything over it. 
  •    The ring finger is Fresh Paint "Winning" stamped with Fresh Paint "Spruce Street" using Pueen stamp #PUEEN33. I added the little fimo Jack O' Lantern. I wanted it to look like a pumpkin patch, but it's kind of hard to see the vine stamping. Oh well. I still love the little pumpkin!
  •     Finally, for my pinky I used Whet "Facetious" with a light coat of the WnW "Rock N' Roll." I placed the little sequins on and topcoated them in. 
I don't normally wear skittle manis - I think they are cute, but something about the lack of symmetry on my own hands irritates me. I guess we will see how long this stays on :)


Wednesday, October 22, 2014

Walking Dead Nails

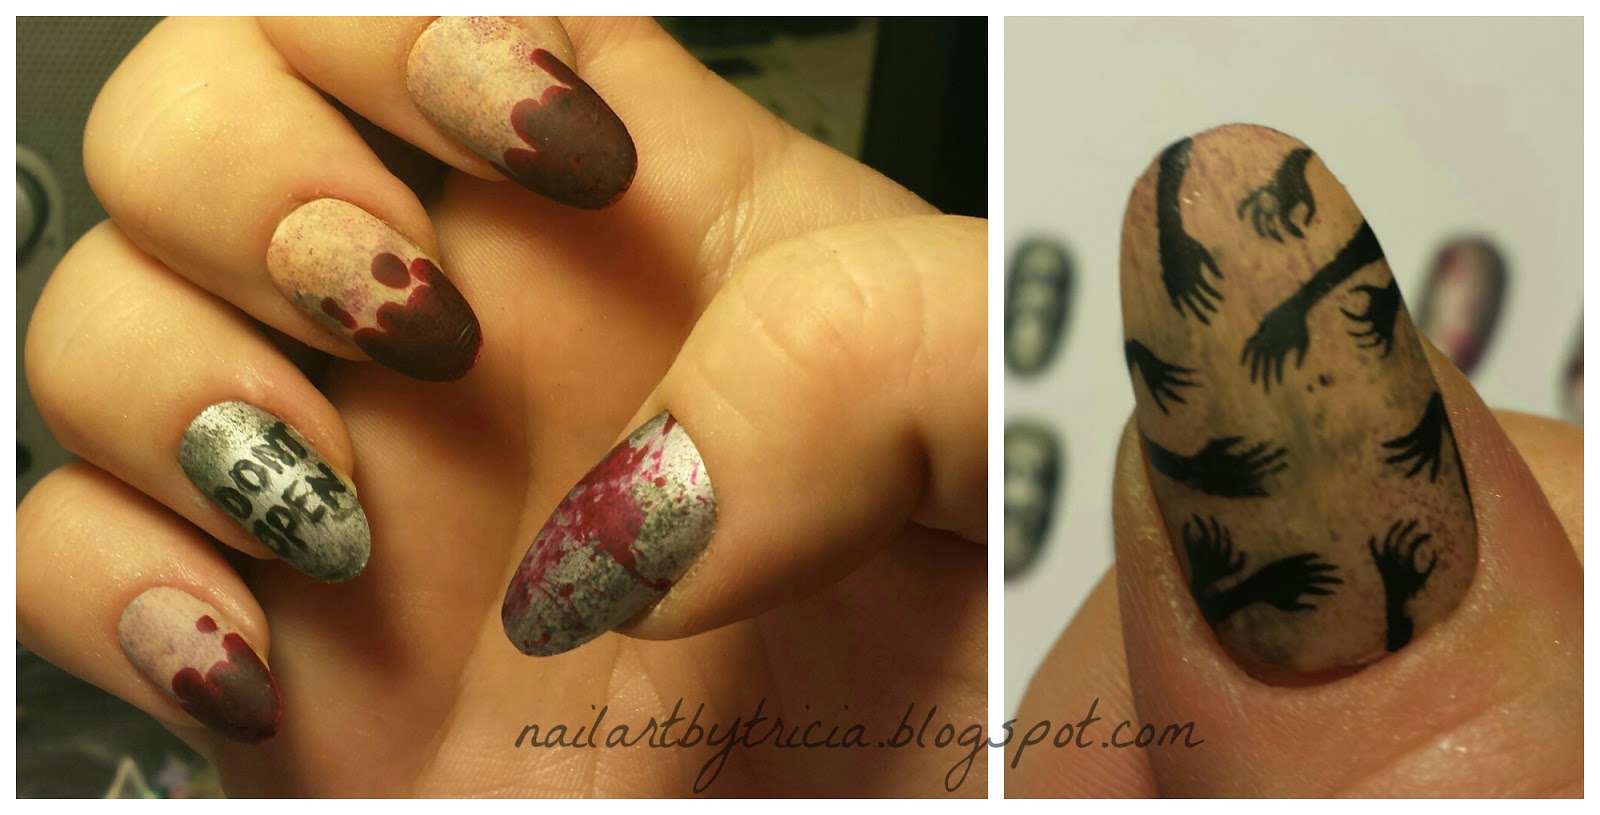
Out of all the nail art I have done (so far), I would have to say these are probably my favorite. First and foremost, I must state that I cannot take credit for this design. I had someone make a request for a set of Walking Dead nails, so I did a search. I am not personally a Walking Dead fan, so I wasn't really "feeling" the theme and desperately needed some inspiration. When I saw this from CopyCat Claws, I knew this was the design I wanted to do with.  You can read her article on how to achieve this look - I followed her script pretty closely, except that I stamped the hands on with a Bundle Monster plate (BM-H08). 

My client was thrilled. When I posted them on my Instagram account, I was estatic to get a comment from Rob Nguyen (from the Nailed It show) - ok maybe not exactly a comment but it was recognition!


Tuesday, October 7, 2014

Inspired by ... Tarte


Today's mani is inspired by the packaging for the Tarte Rainforest After Dark palette.
I started with Kleancolor in Neon Purple, and stamped the snakeskin pattern (BM224) with LA Colors in Reckless. The snake is from Winstonia plate W03, and it's stamped with Sally Hansen Insta-Dri in Style Steel.  I am also sporting a new nail shape - I am working myself into an almond shape.

 I LOVE this mani. It turned out rockin'. :) The pics could be better, but I am working on that.

Tuesday, September 23, 2014

Born Pretty Water Decals - review


I received some floral water decals from the Born Pretty Store to review.  The decals are squares, as opposed to being nail-shaped. This allows you to use them to cover the entire nail, or cut out specific portions to use. I painted my nails with Kleancolor’s “Pastel Teal” to start.
On my first attempt, I decided to cut the entire square and place it on the nail. I painted my topcoat over it, and once it dried, I trimmed the edges. This method worked ok, but the edges looked a little ragged to me. 
For my second attempt, I decided to cut the square into a nail shape. I then applied the water decal, filed off the edge, and topcoated the nail. This method seemed to be less cumbersome, but I also suck at cutting anything straight/even. 
I threw on some rhinestones for the few nails that I didn’t apply the decals, and decided to edge the decals with some glitter (to cover up my rugged edges!). 
I LOVE the design. I love the colors. The water decal itself was a little more difficult for me than I thought it would be initially, but it got easier as I went along. You can get these decals at the Born Pretty Store here, but be sure to use code TTHEX31 to get a 10% discount! 

Sunday, September 14, 2014

New Bundle Monster Sun Kissed plates


Summer is not gone yet! I keep telling myself that. I decided a good beach-inspired mani would keep me in the summer spirit - plus I just received my new plates from Bundle Monster! You can check them out here. For a limited time you can get the set of 10 for only $7.99! 
Here’s the breakdown:
Pinky finger: Base is Essie “Blanc.” Stamped the gold tritons (you can barely see them) with ELF “Pot of Gold and BM-509. Directional circle is from plate BM-507 and Salon Express black.  There is a small black rhinestone in the center of the circle.
Ring finger: Base is a beige from The New Black’s Runway collection. I used the Salon Express black again to stamp the palm trees from BM-510.
Middle finger: Base is Kleancolor “Sheer Pastel Pink.” Shells are plate BM-505 and I used Salon Express white. I need a brighter white. 
Index finger: Base is Fresh Paint “Firefly.” Waves are stamped with Salon Perfect “Baby Blues” and BM-509. Mermaid is Salon Express black and BM-510. I added a few small pieces of glitter for “bubbles.”
Thumb: Used The New Black again, and stamped with Salon Express white. BM-505.
I am pretty pleased with how this turned out; I just wish the white shells would have shown up better. Guess it’s time to invest in a better white - but the question is Konad or Mundo de Unas? Also, I wish I would have used a small gold stud in the center of the directional circle, instead of the black rhinestone. You can’t see it.  You can, however, see the cat hair on my thumb in the last picture. That is Bullet’s contribution - he worked so hard sleeping next to me, I felt awful taking it off. Not really, but we have 8 cats, so hair is an accessory. Maybe one day I will do cat hair nails...

Thursday, September 11, 2014

Cosmic Kitties & Welcome!


This is my first post on Blogger. If you are reading this, thanks for taking the time to stop by! I guess I will write an intro about myself eventually, but nail art is more interesting than me, so let's move on :)

Today’s mani is a depiction of something that rarely ever happens - the idea in my head actually looks like what is on my nails. What a nice change! :)
I used Essence “Hello Marshmallow!” as my base, and did a double stamping of the wavy image on plate m69. I really didn’t intend to do a double stamp, but the first blue I used (Kleancolor “Pastel Blue”) wasn’t very dark, so I overlaid it with Salon Perfect “Baby Blues.” The little stars are from stamp m14, with Essie “Blanc.” Lastly, I used cat water decals from Bundle Monster for my Cosmic Kitty look. I finished off with Poshe Topcoat.  
I was pretty impressed with the decals from Bundle Monster - you can see them here. I thought I was only getting one sheet, but I was pleasantly surprised with all three! For under $2, it was definitely a bargain.